Disclaimer:
- This Article on iNNovationMerge blog is for demonstration purpose.
- Each demonstration presents risk and hazards that must be fully understood before attempting
- It should be performed only by trained professionals
- iNNovationMerge is not responsible for any loss or damage whatsoever caused
- Before attempting understand the Experiment completely or Contact iNNovationMerge for any clarification to get started.
For Feedbacks | Enquiries | Questions | Comments - Contact us @ innovationmerge@gmail.com
What?
- Computer users may experience eye strain and other visual problems due to improper surrounding environment.
- Monitoring light, humidity and temperature parameters of surrounding area and creating proper light and environment conditions will reduce the eye issues.
- This article explains, how we can make use low cost environment monitoring solution to create efficient Study/Work place Environment using Arduino UNO and sensors.
Why?
- COVID-19 made most of the people to work from home and Most of the educational institutions have started Online learning to reduce physical proximity.
- Due to this, people using digital devices(Screen) in variable light and improper surrounding environment are increasing, this may lead to eye strain and other visual problems.
- This article helps in providing solution to monitor and keep our surrounding environment safe and efficient for work/study.
How?
- This article recommends light levels in different areas.
- This article recommends an indoor temperature and humidity conditions.
- As a part of this article, we are considering to create an safe indoor office area.
- Recommendations for creating efficient surrounding area
- 300-600 Lux of Light
- 20°C-24°C of Temperature
- 30%-60% of Humidity
- Following components are used with Arduino to monitor above requirements
- LDR to monitor Light
- DHT11 to monitor Humidity and Temperature
- TFT LCD Display to present the monitoring information
Prerequisite:
Hardware’s Required:
- ARDUINO UNO R3
- 3.5Inch TFT Touch Shield
- LDR Sensor
- 10K ohm Resistor
- DHT11 Sensor
- USB cable
Software’s Required:
Network Requirements
- Internet to download packages
Implementation
Block Diagram
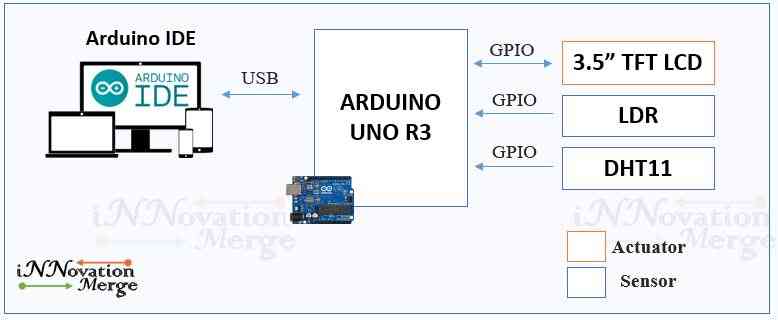
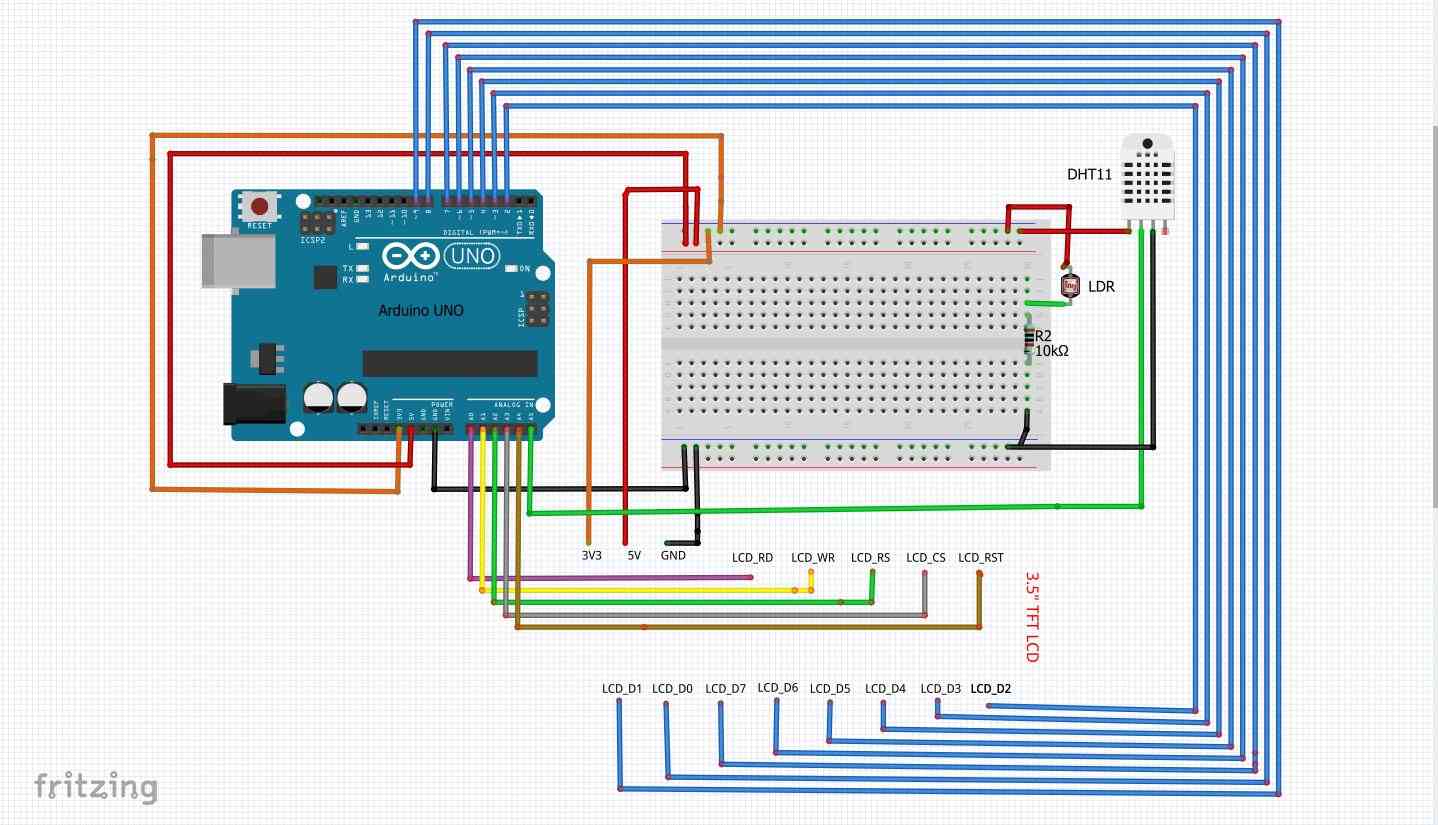
Connect the circuit as below
Setup Arduino UNO
void setup(void) {
  Serial.begin(9600);             // Start Serial monitor
  dht.begin ( ) ;                 // DHT11 sensor will start working
  uint16_t ID = tft.readID();     // read TFT ID
  if (ID == 0xD3D3) ID = 0x9481;  //force ID if write-only display
  tft.begin(ID);                  //Start TFT at ID
  tft.setRotation(1);             //Rotate display
  tft.fillScreen(WHITE);          //Fill white background to display
  WelcomeScreen();                //Call Welcome screen
  tft.fillScreen(WHITE);          //Clear and Fill white background and text to display
  DisplayTextString(100, 5, 3,DARKGREEN,"iNNovation");
  DisplayTextString(280, 5, 3,ORANGE,"Merge");
  DisplayTextString(50, 50, 2,ORANGE,"---> WORKPLACE MONITORING <---");
}
Function to print Welcome Screen on TFT Display
void WelcomeScreen(void){
  tft.drawFastHLine(5, 100, tft.width(), BLACK); // Print Horizontal black line
  tft.drawFastHLine(5, 200, tft.width(), BLACK); // Print Horizontal black line
  delay(100);                                    // Delay of 100ms
  DisplayTextString(20, 110, 3,BLACK,"Welcome To"); // Display text
  delay(100);                                    // Delay of 100ms
  DisplayTextString(50, 150, 4,DARKGREEN,"iNNovation");// Display text
  DisplayTextString(300, 150, 4,ORANGE,"Merge");    // Display text
  delay(1000);                                      // Delay of 100ms
}
Function to print any text on TFT Display at X,Y Positions with custom color
void DisplayTextString(int x, int y, int sz, const char *color, String msg)
{
  tft.setTextColor(color);  //Set color
  tft.setTextSize(sz);      //Set Text Size to display
  tft.setCursor(x, y);      //Set Cursor to start printing
  tft.print(msg);           //Print message
}
Function to Calculate Lux Value of surrounding light
float GetLuxValue()
{
  sensorValue = analogRead(sensorPin);  //Read from sensor pin declared
  float vout = sensorValue/204.6;       // Calculate voltage
  float R = (11000-vout*200)/vout; // calculate the resistance
  float lux = 65.9 * (pow( sensorValue, 0.352));//lux calculation;
  return lux;
}
Function to get and display Light, Humidity, Temperature values on Display
void loop(void) {
  // Get Lux value and display accordingly
  if(GetLuxValue()<500){
    LuxValue = "Light: Low!";
  }
  else if(GetLuxValue()>500 && GetLuxValue()<700){
    LuxValue = "Light: Perfect!";
  }
  else{
    LuxValue = "Light: High!";
  }
  // Get Humidity and Temperature value
  String humidity = "Humidity(%): "+String(dht.readHumidity ( )) ;  // Declaring h a variable and storing the humidity in it.
  String temp = "Temp(*C): "+String(dht.readTemperature ( )) ; // Declaring t a variable and storing the temperature in it.

 // Display text inside rectangle boxes
  tft.fillRect(10,80,460,60,MAGENTA);
  DisplayTextString(80, 100, 3,WHITE,LuxValue);
  tft.fillRect(10,160,460,60,DARKGREEN);
  DisplayTextString(80, 180, 3,WHITE,humidity);
  tft.fillRect(10,250,460,60,BLUE);
  DisplayTextString(80, 270, 3,WHITE,temp);
  delay(1000);
}
Clone and Run the project
Demo - Click below
- Great, iNNovationMerge hope that you have understood how to Monitor and Create comfort Study/Work Place Environment