For Feedbacks | Enquiries | Questions | Comments - Contact us @ innovationmerge@gmail.com
Prerequisite
What?
- Apache Spark is a fast and general purpose cluster computing system. It is used as a lightning fast unified analytics engine for bigdata & Machine Learning applications.
- Apache Spark is an Engine
- To process data in real time & batch mode
- To respond in subsecond
- To perform in Memory processing
- According to Spark documentation it is an alternative to Hadoop Map Reduce
- 10-100 percent faster than Hadoop
- 10 Times faster than accessing data from disk
- Very fast speed and ease of use
- It provides high level API’s in JAVA, Scala, Python & R
- This article explains how to setup and use Apache Spark in a multi node cluster environment.
Why?
- Apache Spark is used for distributed, in memory processing and it is popular due to below offerings
Spark Core- Allows to consume and process Batch dataSpark Streaming- Allows to consume and process continous data streamsClients- Interactive ProcessingSpark SQL- Allows to use SQL Queries for structured data processingMLib- Machine Learning library that delivers high quality algorithmsGraphX- It is a library for Graph Processing
- Apache spark support multiple resource manager
Standalone- It is a basic cluster manager that comes with spark compute engine. It provides basic funcationalities like Memory management, Fault recovery, Task Scheduling, Interaction with cluster managerApache YARN- It is the cluster manager for HadoopApache Mesos- It is another general purpose cluster managerKubernetes- It is a general purpose container orchestration platform
- Every developer needs an local environment to run and test the Spark application. This article explaines detailed steps in setting up the multinode Apache Spark Cluster.
How?
- When an application is submitted to Spark, it will create one driver process and multiple executer process for application on multiple nodes.
- Entire set of Driver & Executors are available for application.
- Driver is responsible for Analysing, Distributing, Scheduling, Monitoring and maintaining all the information during the lifetime of the application.
- Each node can have multiple executor’s. Executer’s are responsible for executing the code assigned to them by Driver and reports the status back to the Driver.
Hardware’s Required
- The steps of this article are tested with below Laptop configuration
RAM: 12GB DDR4Processor: Intel Core i5, 4 coresGraphic Processor: NVIDIA GeForce 940MX
Software’s Required
- Windows 10
- VirtualBox
- Ubuntu 18.04.5 LTS ISO Image
- Apache Spark
Network Requirements
- Internet to download packages
Implementation
Create Master and Worker Nodes
- Create below configuration Machine’s in VirtualBox(Refer Prerequisite section)
- Master - 2 vCPU, 3GB RAM, Ubuntu OS
- Node1 - 2 vCPU, 1GB RAM, Ubuntu OS
- Node2 - 2 vCPU, 1GB RAM, Ubuntu OS
Create Host-only network
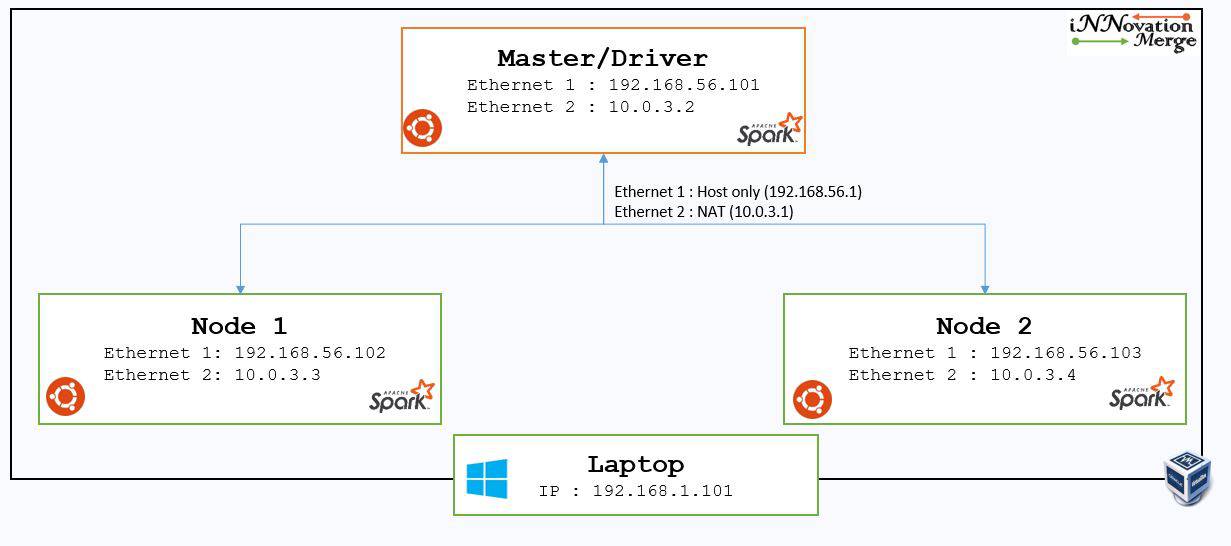
- Apache spark needs Static IP address to communicate between nodes.
- VitualBox has Host-only network mode for communicating between a host and guests.
- In simple words nodes created with this network mode can communicate between each other and The VirtualBox host machine(Laptop) can acess all Vm’s connected to the host-only network.
- In VirutalBox software Navigate File -> Host Network Manager

- Click on Create -> Configure Adapter manually with
IPv4 Address: 192.168.56.1 andNetwork Mask: 255.255.255.0 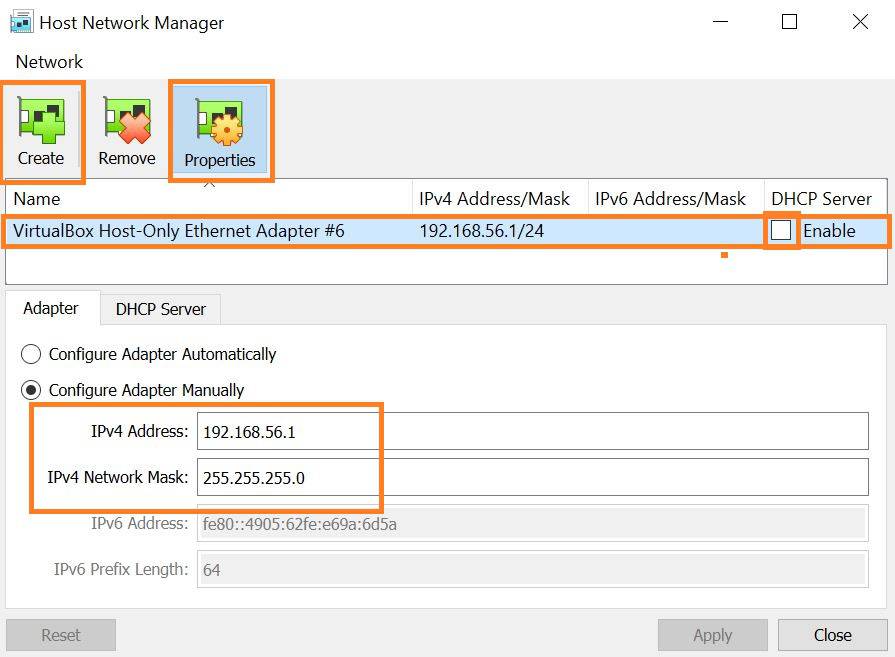
Assign Host-only network for Master and worker nodes
- Select the
machine->Settings 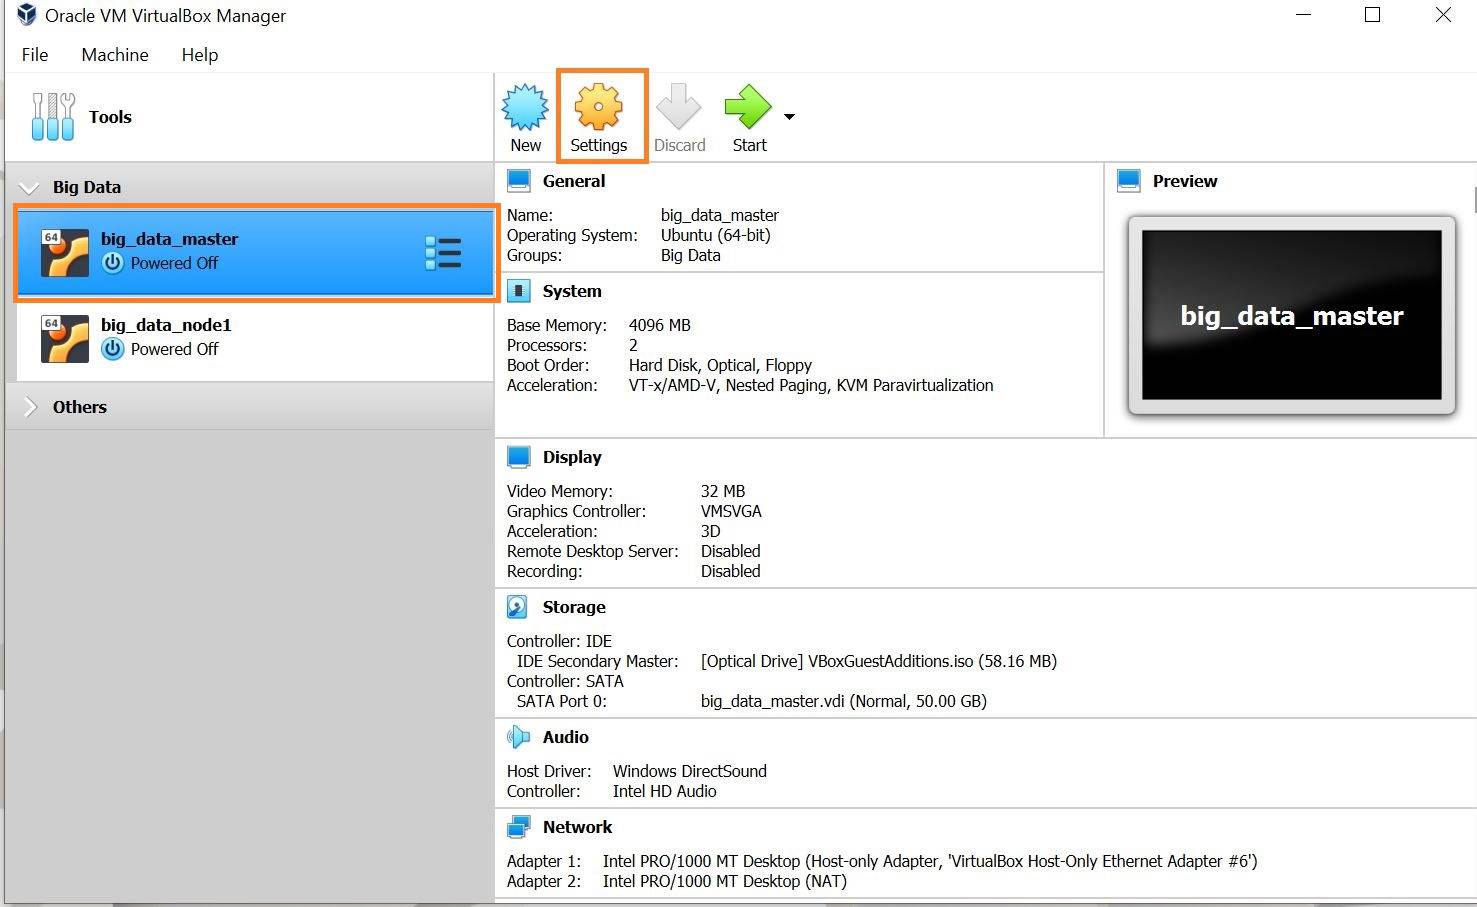
- Navigate to
Network->Adapter1and set as below 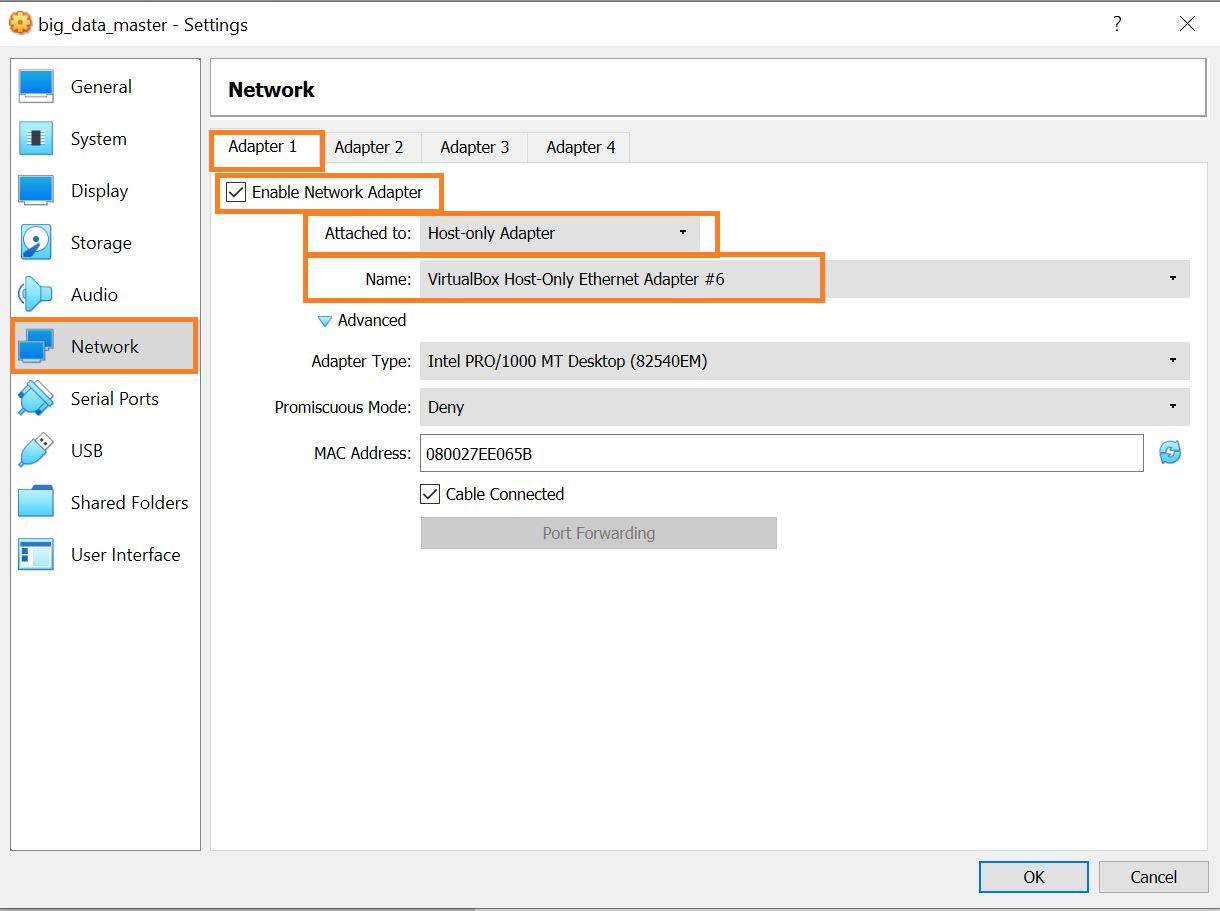
Assign NAT Network Adapter for Master and worker nodes
- Since internet is needed for the nodes, NAT network is used
- Select
Adapter 2and Configure as below 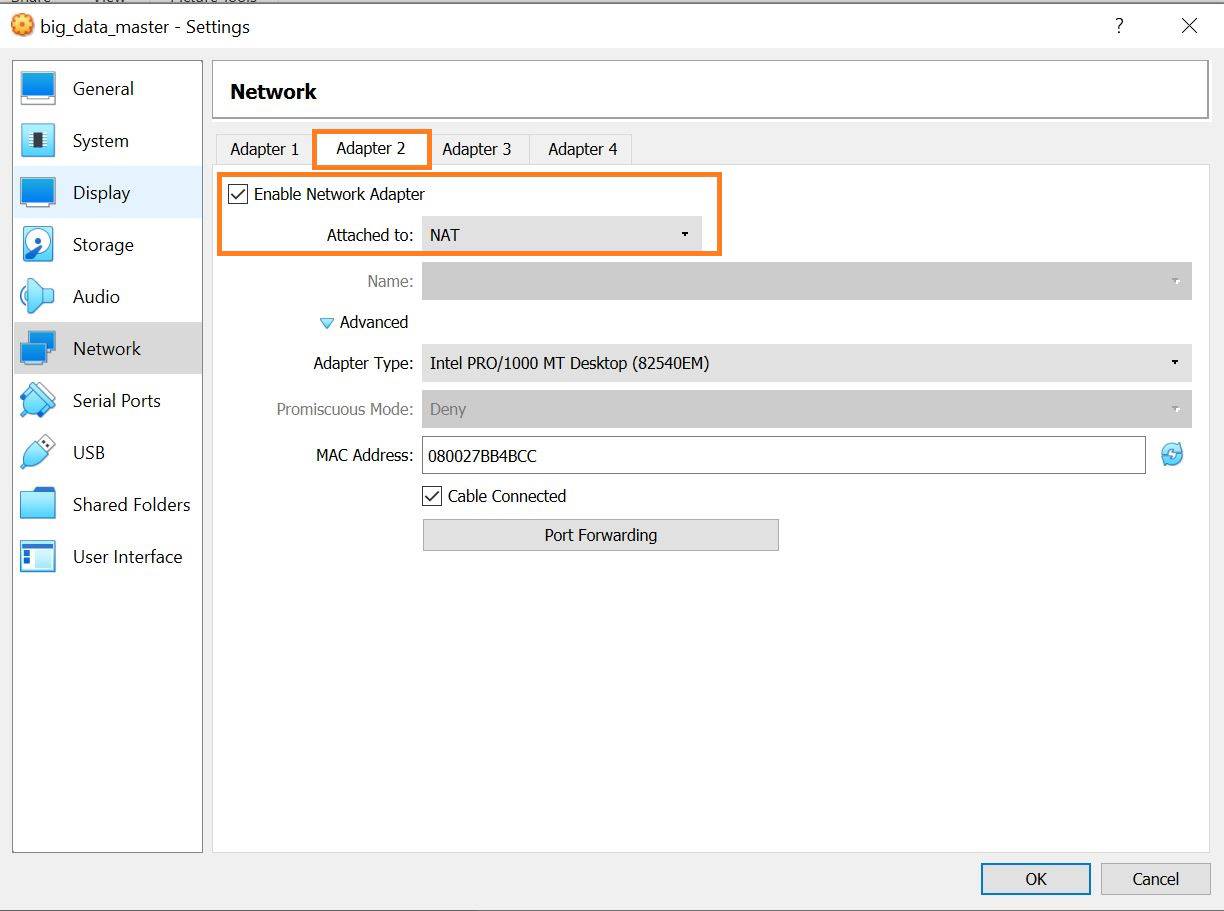
Verify network configuration
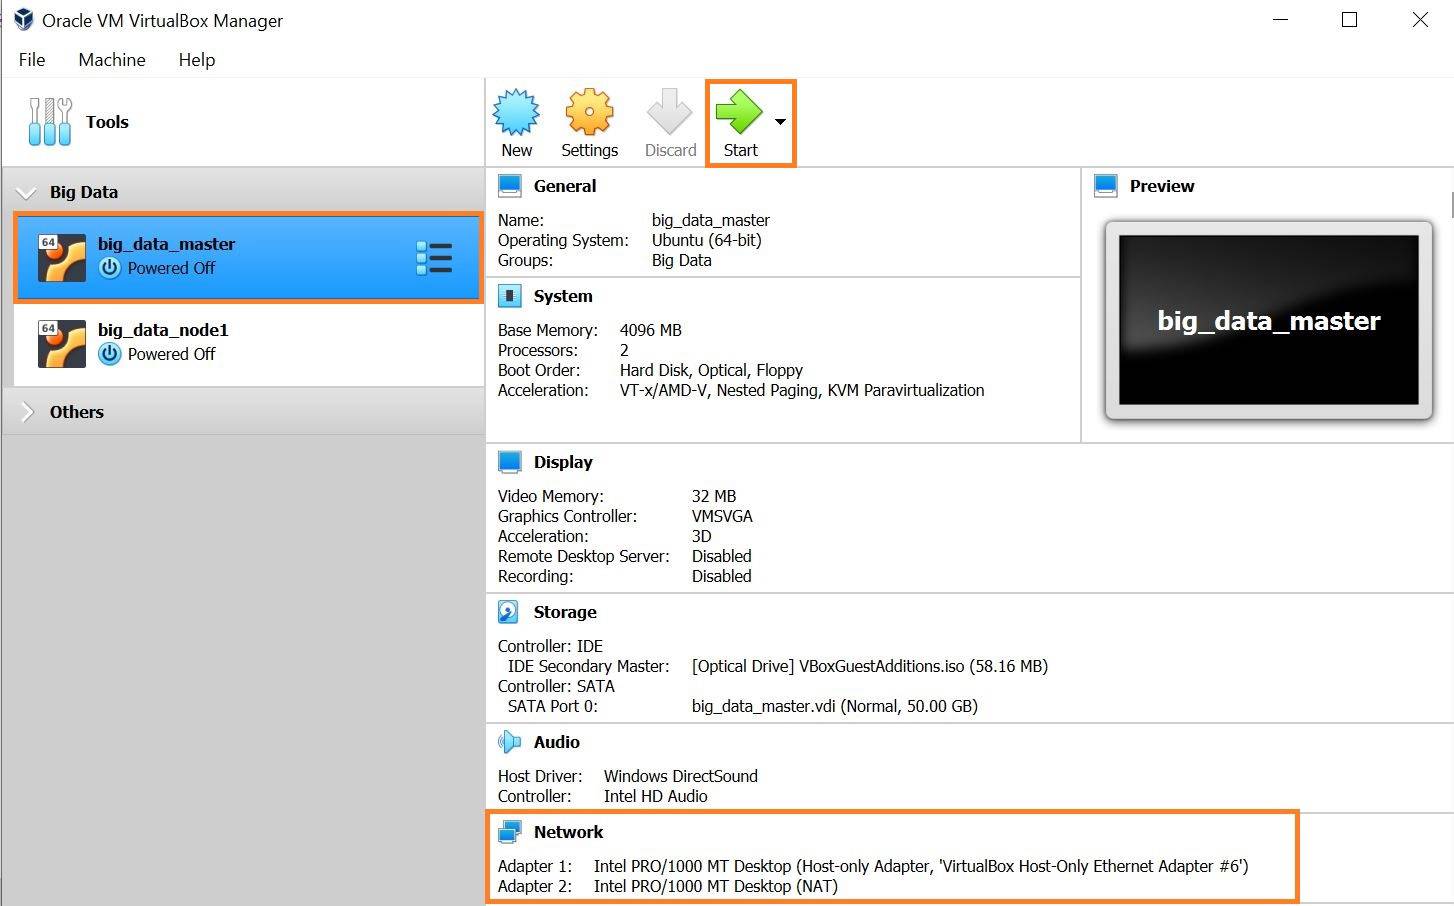
Start Master and Worker nodes from VirtualBox
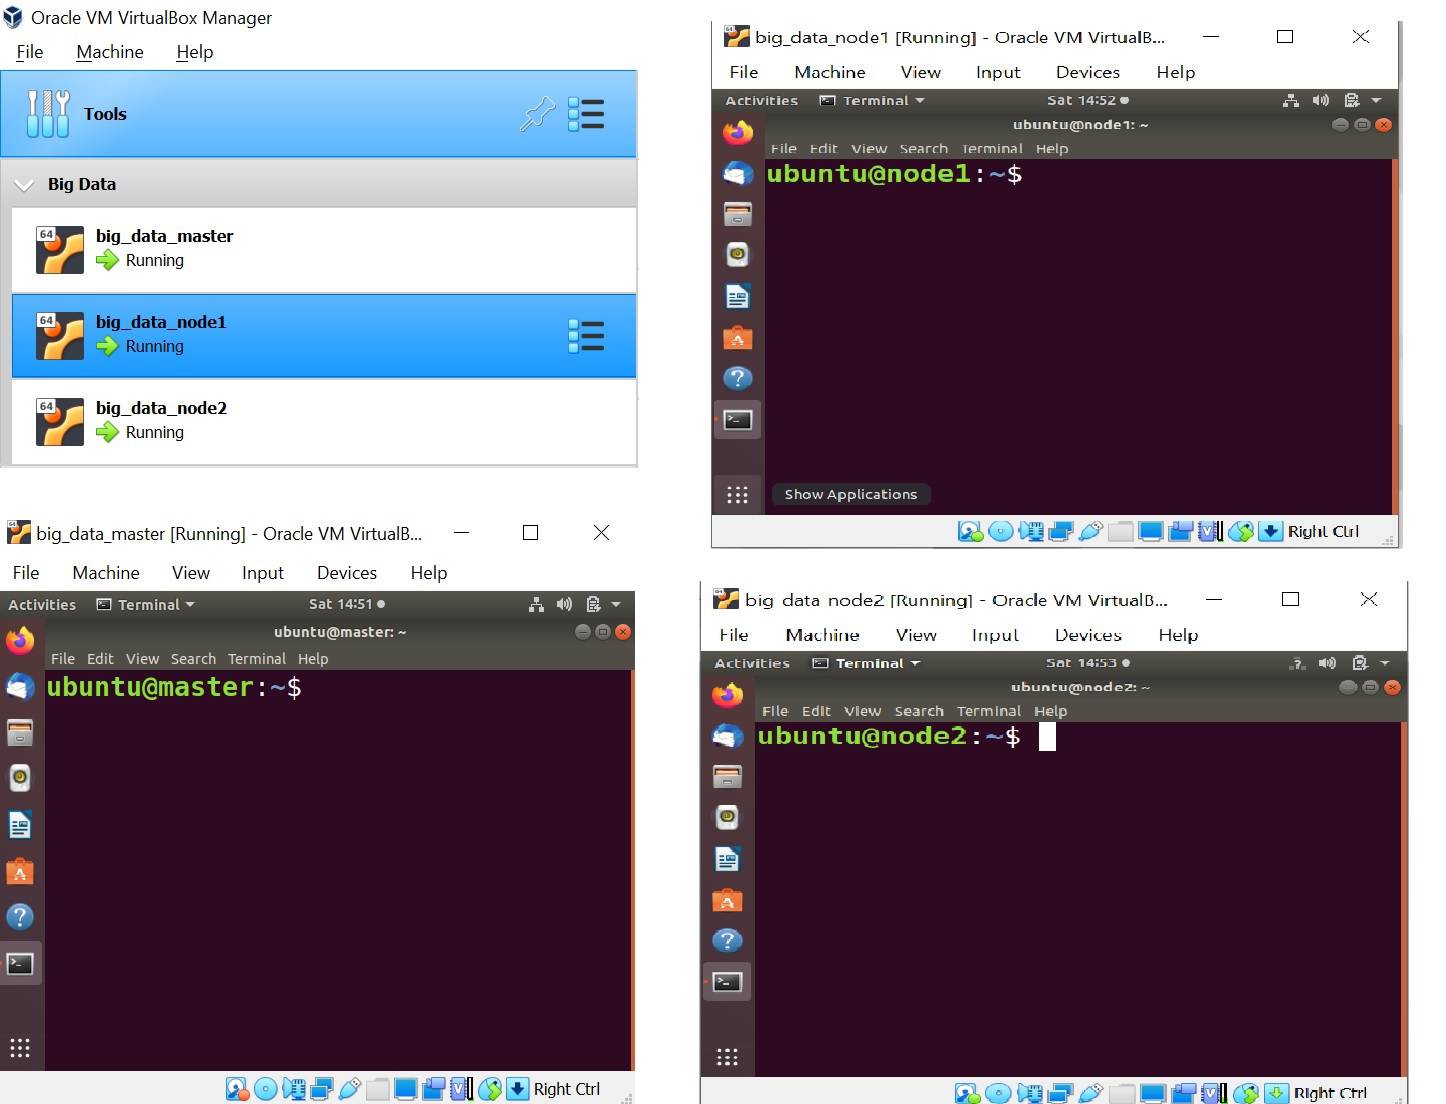
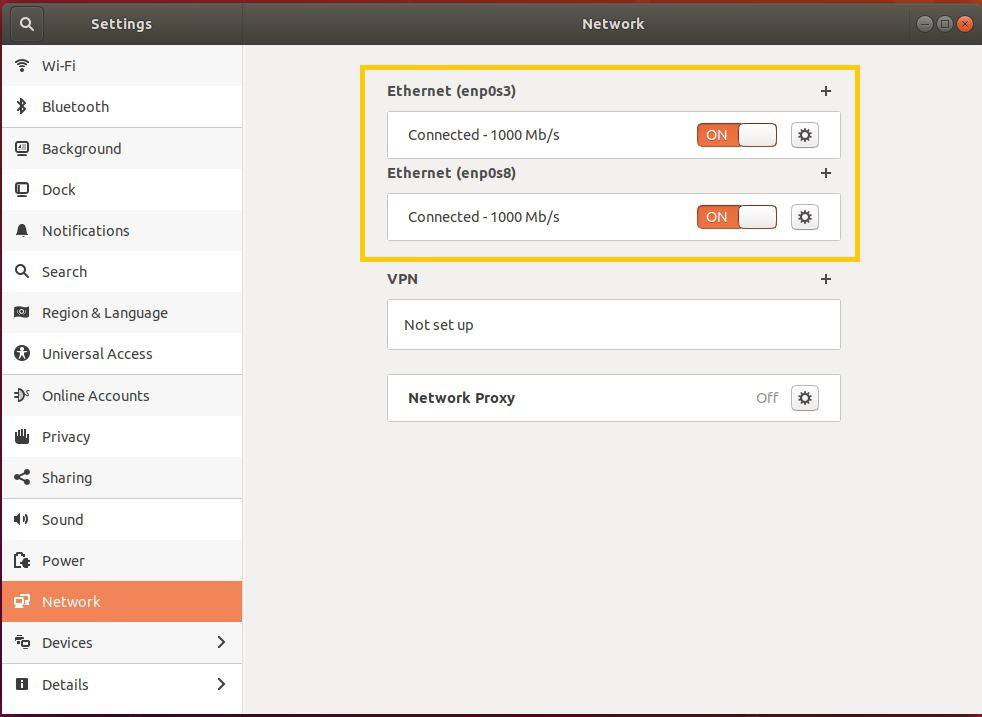
Check network settings in each node
- Two Ethernet networks must be connected
- Click on Ethernet 1 Settings -> IPv4 -> Manual
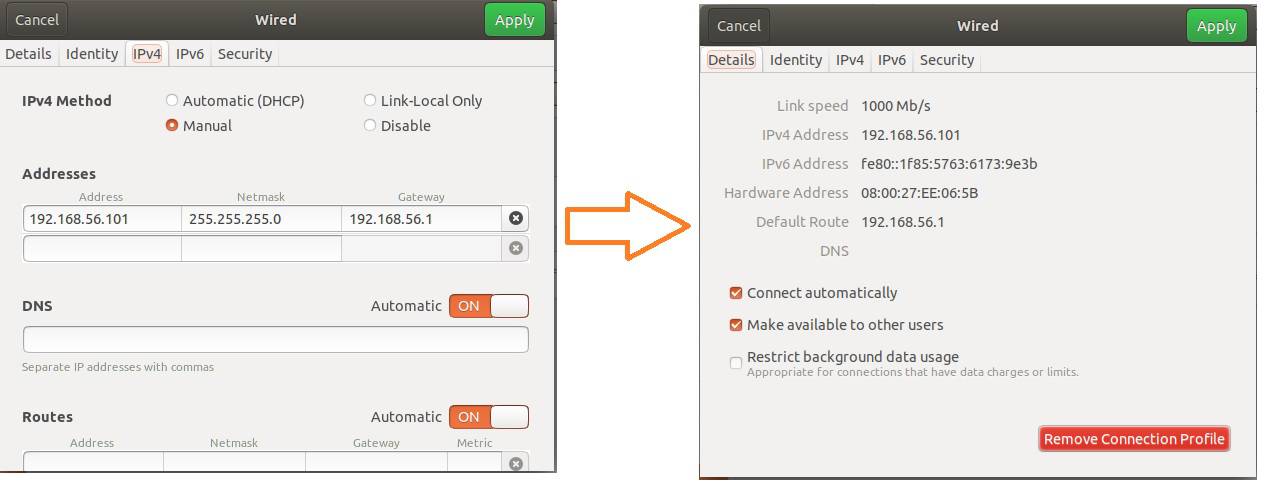
- For Master/Driver
- Address : 192.168.56.101
- Network Mask : 255.255.255.0
- Gateway : 192.168.56.1
- For node1
- Address : 192.168.56.102
- Network Mask : 255.255.255.0
- Gateway : 192.168.56.1
- For node2
- Address : 192.168.56.103
- Network Mask : 255.255.255.0
- Gateway : 192.168.56.1
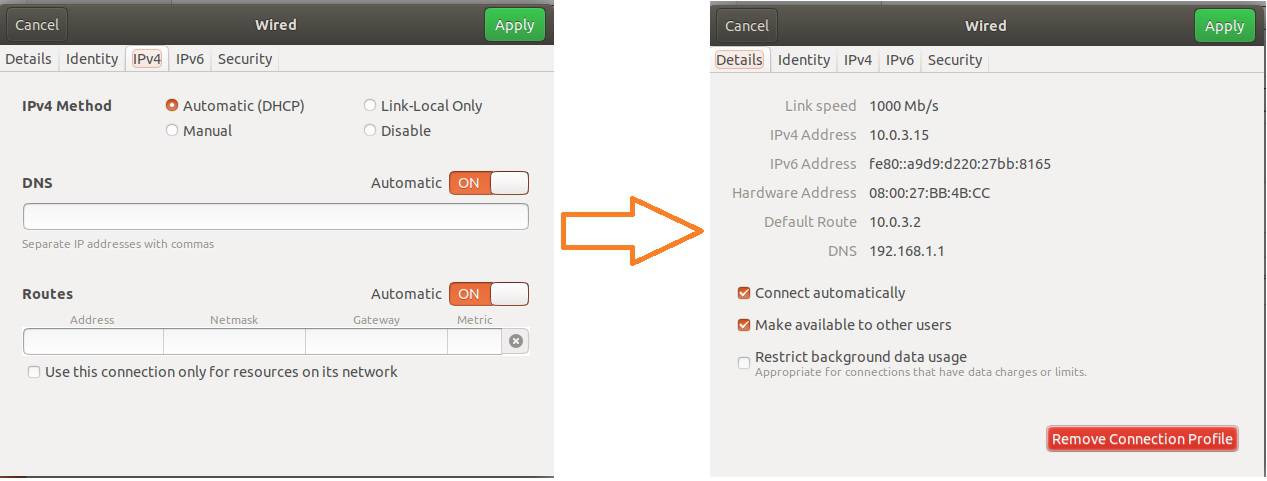
- Click on Ethernet 2 Settings -> IPv4 -> Automatic(DHCP) in all the nodes
Check network connectivity between Hosts and Nodes
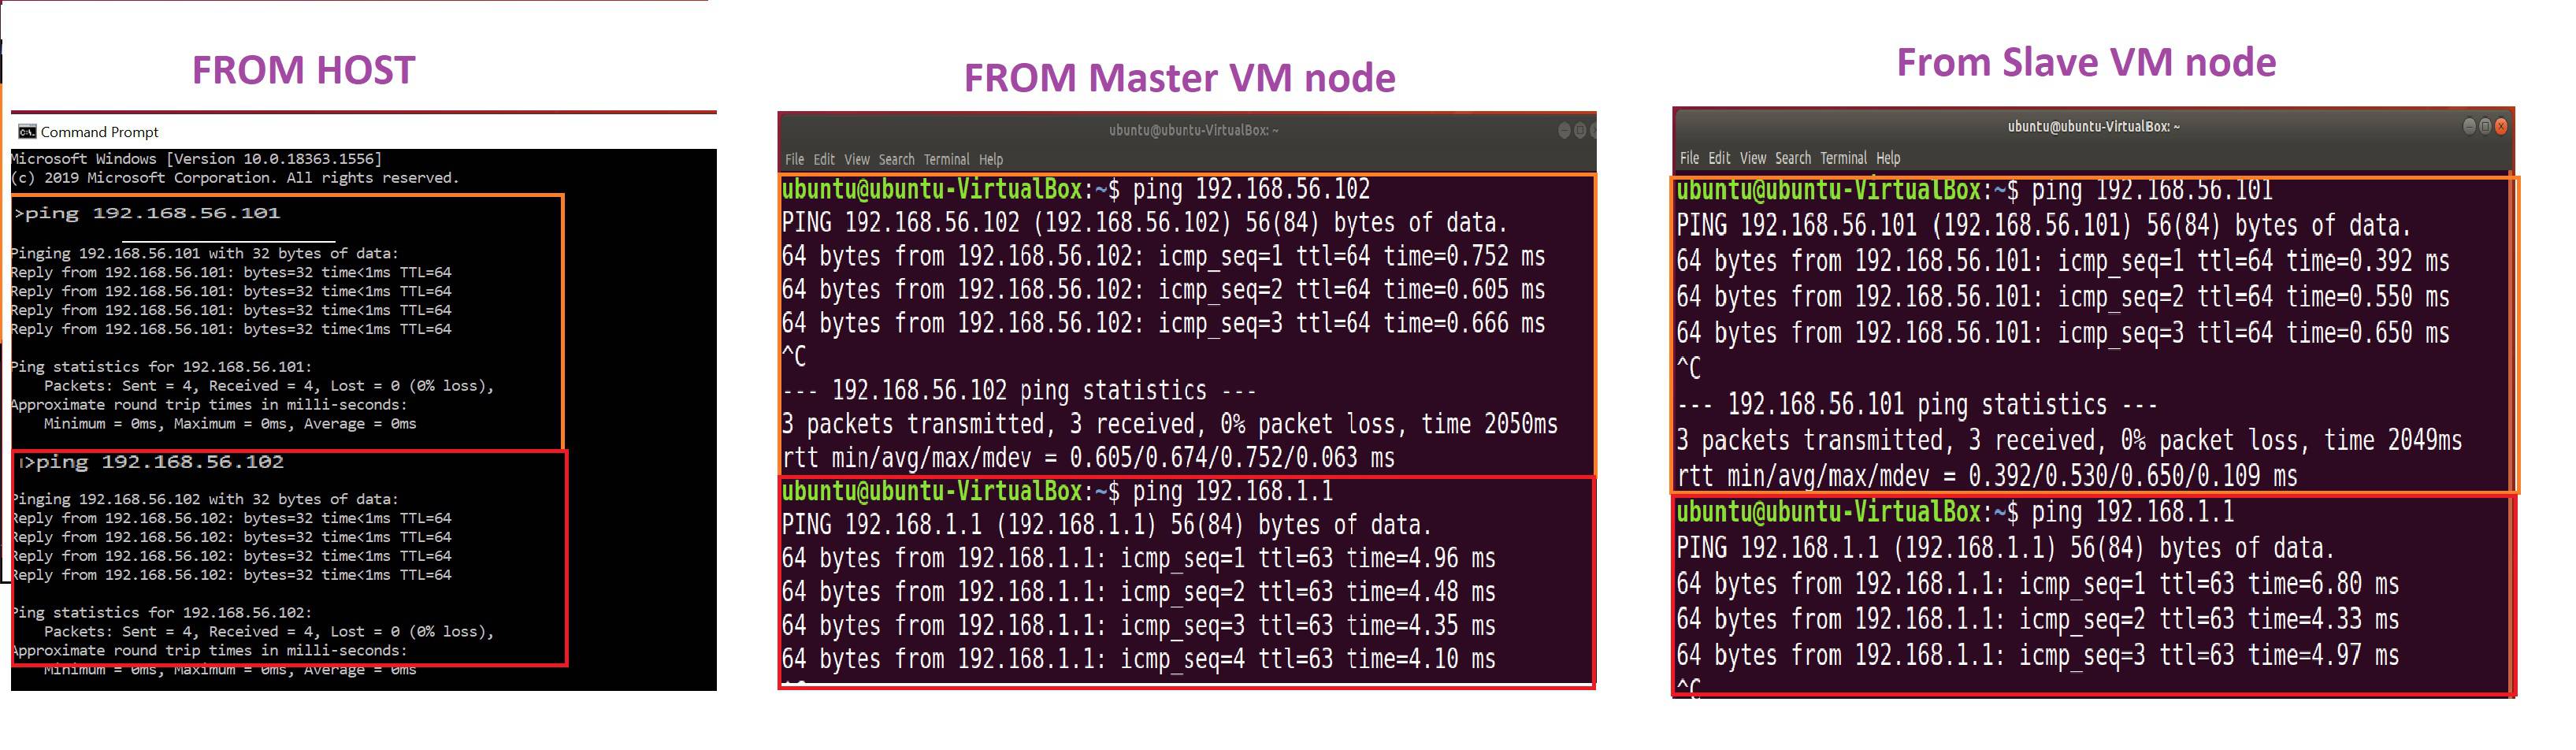
Get all Host-only network IPs
- master - 192.168.56.101
- node1 - 192.168.56.102
- node2 - 192.168.56.103
Set hostname
- Open hostname file on master, node1 and node2 and set its respective hostnames as below
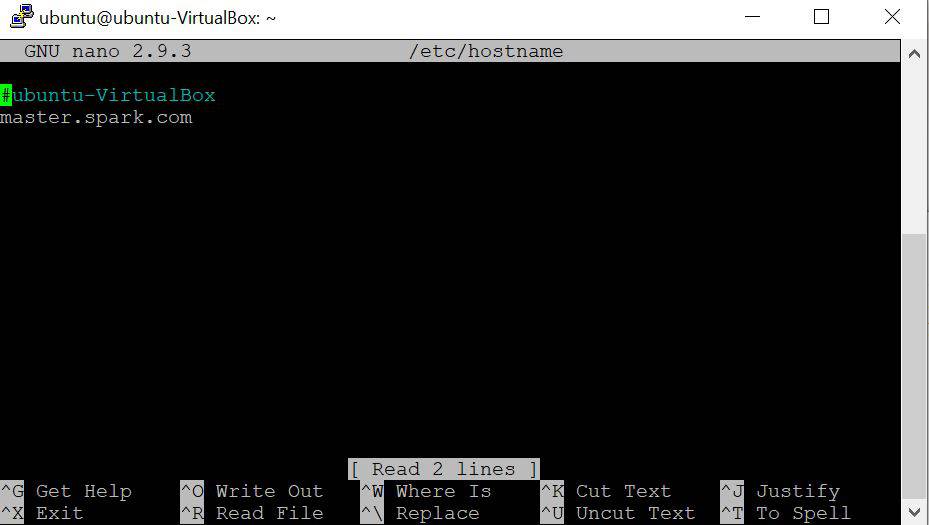
sudo nano /etc/hostname

# Add below lines
* On master - master.spark.com
* On node1  - node1.spark.com
* On node2 - node2.spark.com
Add network information to hosts file of master, node1 and node2
sudo nano /etc/hosts

# Add below lines
192.168.56.101	master.spark.com
192.168.56.102	node1.spark.com
192.168.56.103	node2.spark.com
- After adding reboot all the machines
rebootInstall java on all the nodes
sudo add-apt-repository ppa:webupd8team/java

sudo apt-get update

sudo apt-get install openjdk-11-jdk

java -version
Setup SSH only in master
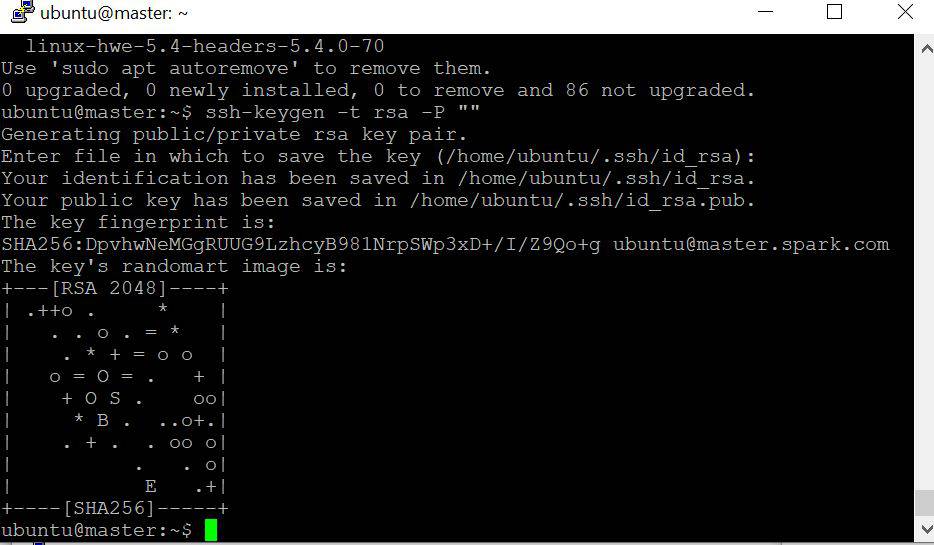
sudo apt-get install openssh-server openssh-client

ssh-keygen -t rsa -P ""

cat ~/.ssh/id_rsa.pub >> ~/.ssh/authorized_keys

ssh-copy-id ubuntu@master.spark.com

ssh-copy-id ubuntu@node1.spark.com

ssh-copy-id ubuntu@node2.spark.com
Download and install latest Apache spark on all the nodes
tar -xvf spark-3.1.2-bin-hadoop3.2.tgz

sudo mv spark-3.1.2-bin-hadoop3.2 /usr/local/spark

sudo nano ~/.bashrc

# Add below lines
export PATH=$PATH:/usr/local/spark/bin

source ~/.bashrc
Configure Master information on all the nodes
cd /usr/local/spark/conf

cp spark-env.sh.template spark-env.sh

sudo nano spark-env.sh

# Add below lines
export SPARK_MASTER_HOST=master.spark.com
Configure Slaves/Worker information only on Master
sudo nano slaves

# Add below lines
node1.spark.com
node2.spark.com
Disable firewall
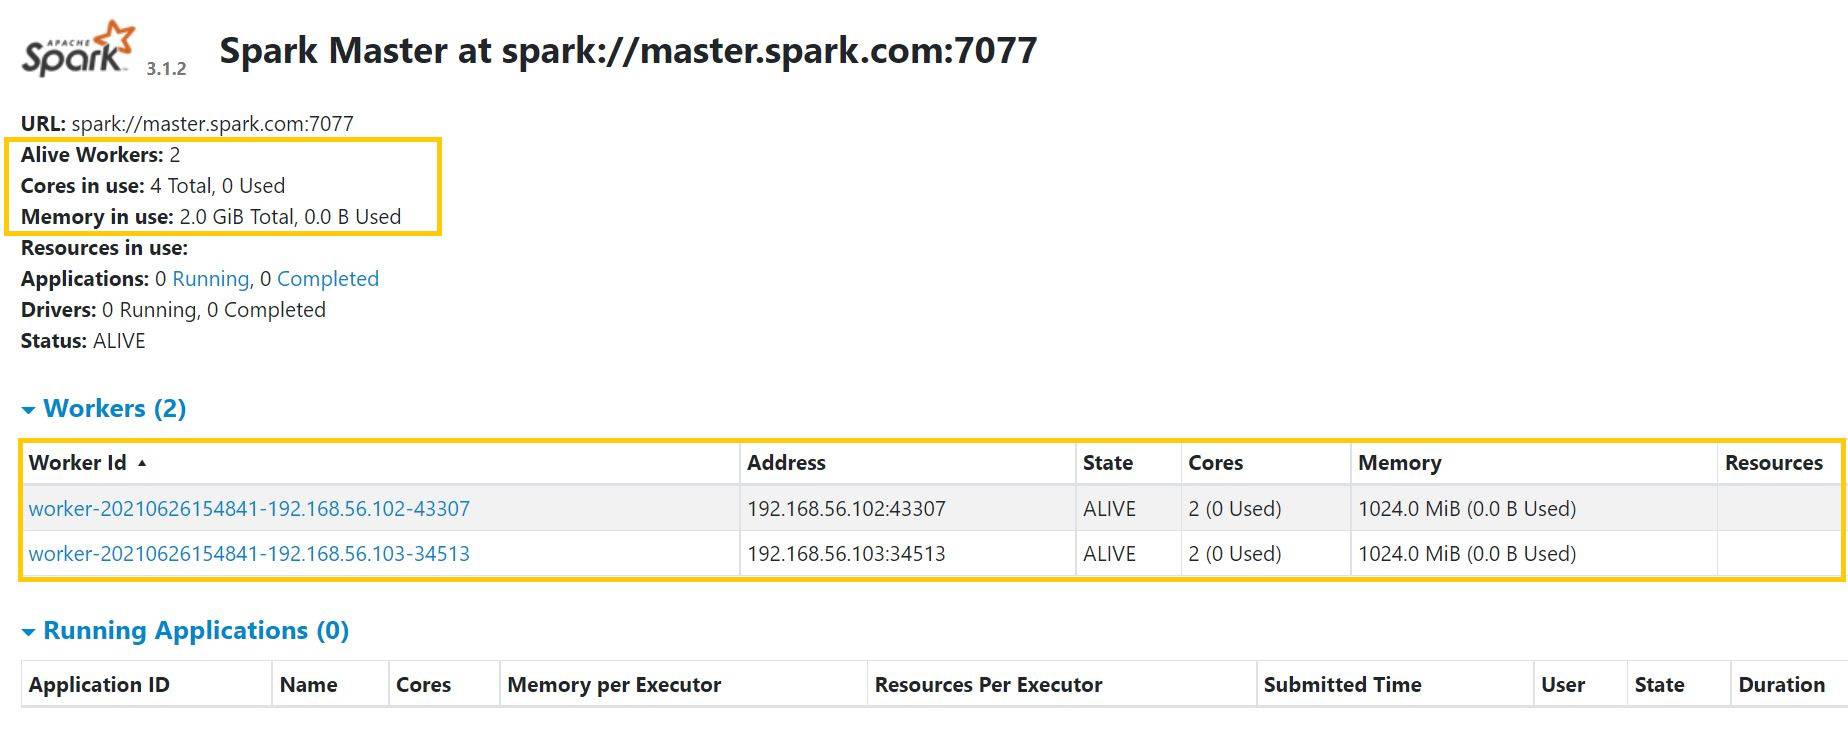
sudo ufw disableStart spark from master
cd /usr/local/spark

./sbin/start-all.sh
Open Spark URL http://192.168.56.101:8080/
Configure Jupyter Notebook
pip install jupyter

sudo nano ~/.bashrc

# Add below lines
export PYTHONPATH=$SPARK_HOME/python:$PYTHONPATH
export PYSPARK_DRIVER_PYTHON="jupyter"
export PYSPARK_DRIVER_PYTHON_OPTS="notebook"
export PYSPARK_PYTHON=python3
export PATH=$SPARK_HOME:$PATH:~/.local/bin:$JAVA_HOME/bin:$JAVA_HOME/jre/bin

source ~/.bashrc
Run Jupyter Notebook
jupyter notebook --ip 0.0.0.0Open Jupyter Notebook from URL http://192.168.56.101:8888/
- Start Coding
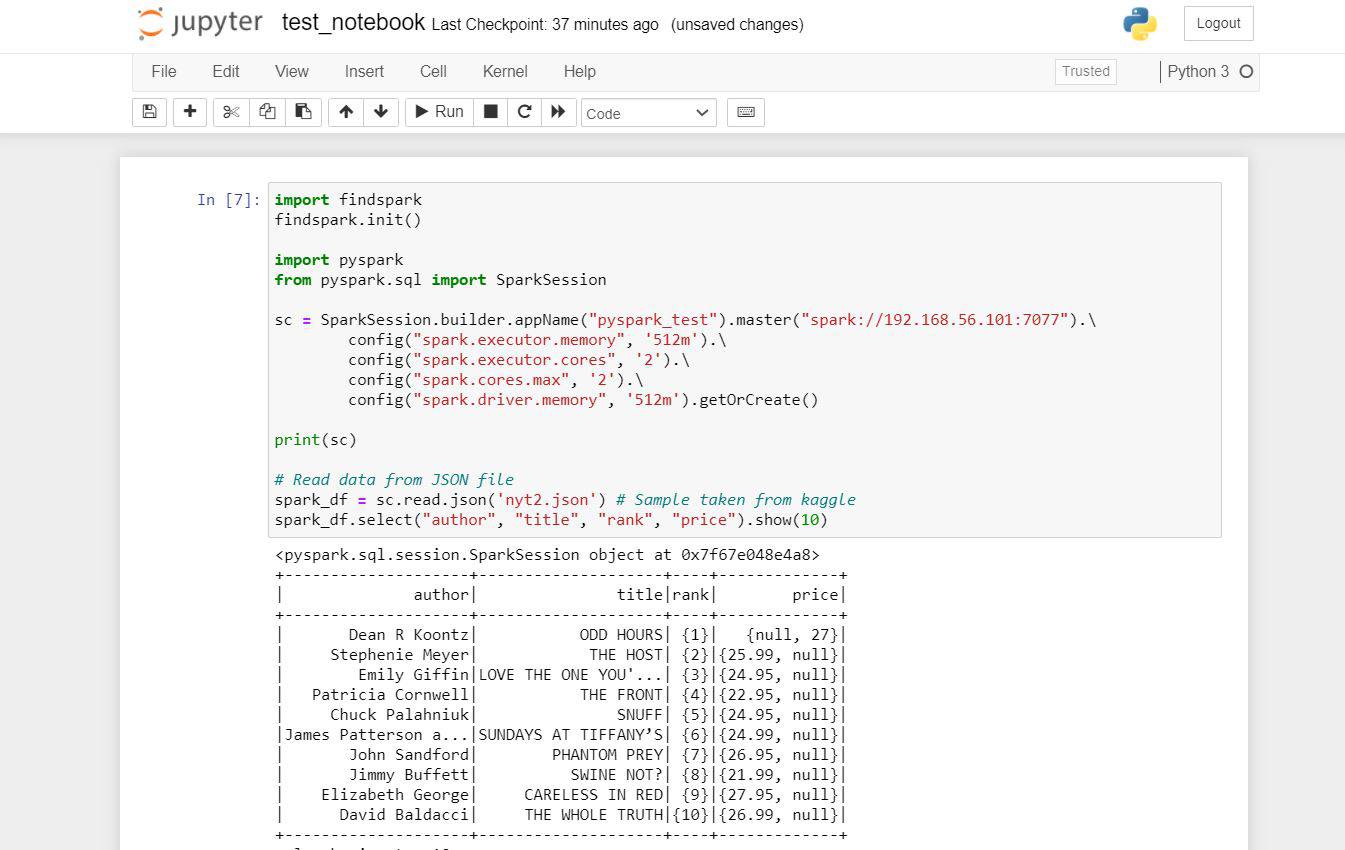
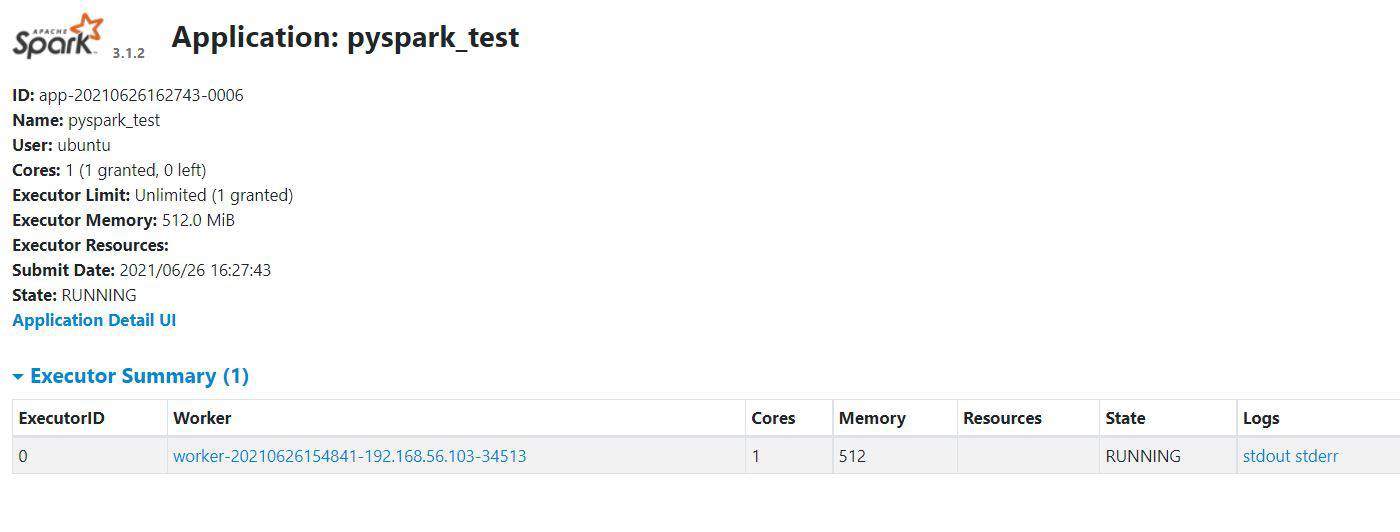
View application from Spark Master URL
Great, iNNovationMerge hope that you have understood how to Set up a multi-node Apache Spark Cluster on a Laptop